A place where I can share my thoughts as I journery into homesteading/farming, self reliance, crafting, homeschooling, and any other adventure that comes my way.
Thursday, June 9, 2011
For Father's Day
It's time to honor Father's this week. We were asked to design something for this special day this week. I wanted to make a card, but also wanted something different as well. I borrowed this idea from a friend and tweaked it into a card, but could be used as a quick picture book, or scrapbook for any special occasion or person.
As always I gathered what I thought I would use in the project, but this one became an adventure to the tool shed and tackle box.
The first step was to make the pages. I used Plantin schoolbook cartridge for the rectangle and the letters and welded them together. I'm sure you could use any cartridge and font for this to fit your theme. I welded a 9.5x4 in rectangle to a 1.5x4in letter. I spelled out the word DADDY for my card.
I alternated between plain and print cardstock on the letters. I used Colorbok printed cardstock (I think I bought it 10 yrs ago) and for the plain I used DCWV neutral and autumn stacks. After all of the pieces were cut I laid them out to make sure they lined up. Then for me the "fun" part began...that is sarcasm because I hate cutting by hand.
I didn't take any pictures of this unfortunately so bear with me on an explanation. I had to cut the layers down so that they would all fit into a book. I laid the back piece (without a letter) down, and placed the last page on top of that; lined it up to where I wanted it to lay, flipped it over and drew a line to mark where it needed to be cut. I then cut it with a paper cutter. You do this with each layer. Each page from bottom up gets smaller and smaller. The top page I left room to fold over and make a binding for the book. I then inked all of the edges with gold ink. Then to the fun part the decorating.
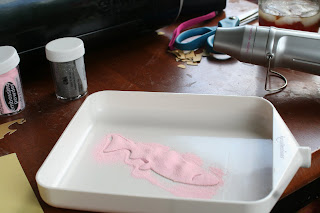
This entire card came to mind because of this fish....the elusive (for hubby) King salmon. I cut him out using the wildlife cartridge at 4.5 in. He's a big fish so I wanted him to take up the entire front. I also cut the layers for him. I used stampendous clear ink and covered both pieces entirely, then I used stampendous pink embossing powder for the bottom layer and stampendous silver for the top layer....used my heat tool on them to finish them, glued the layers together and then set them aside.
It was then time to assemble the book. I placed all of the layers together, folded the binding part over and clipped it on 3 sides so that none of them slipped.
I then grabbed my piercing tool (a hammer, nail, and piece of wood) and pierced the paper 1 inch down and 1 inch up on the side. I then used the same wood and hammer as I added 2 eyelets to secure the pages a bit better.
At this point I added the sentiment inside each page which the entire card reads; DADDY You will always be our King, Happy Father's Day. I decorated with stickers from Jolees Boutique, and ribbon to look like fishing lures. It still looked a little plain so I added fishing line around all of the letters and hooked it into the fishes mouth. I will add what the *recipe* is at the end of the pictures....this is the inside of the card.
*recipe*
Colorbok printed cardstock
DCWV neutral & autumn stack plain cardstock
ribbon
eyelets
gold ink
Jolees Boutique stickers
stampendous clear ink, pink and silver embossing powders
cricut cartridges: Plantin Schoolbook, Wildlife, Calligraphy
Thanks for looking. I hope all father's have a wonderful Father's Day.
Subscribe to:
Post Comments (Atom)


No comments:
Post a Comment