Thursday, June 23, 2011

Sassy Stripes

Hi everyone! This week at Sweetandsassydiva we were asked to design something using stripes for the 4th of July. I knew exactly who I had in mind when I started my project. I have an Aunt who is a "Firecracker" lady, so I decided this would be just for her.

This card was simple and easy to make. It was inspired by Card Maker, Folding Techniques magazine. I am really liking that magazine.

The card itself is a 4x6 that I rounded the edges on. (red is DCWV neutral stack) The blue background is a 3 1/2 x 5 1/5 also rounded. The dress is made from scallop flowers cut from the lacy labels cartridge. (paper is from DCWV Nantucket stack) I cut 2 flowers at 3, one at 3 1/2 and one at 4. Then I folded them all the same way...which I will show you now ;)
First fold in 1/2

Then fold in 1/2 again

Now that gives you your middle, you are going to fold down each edge towards the middle.

That's it...all of the folding needed. For the top of the dress I turned one of the 3 in folded pieces so that the folds were on the back and the scallops were on the top. For the dress portion I layered them so that the folded pieces made a line on the front, and folded the very bottom scallop under. I used some ribbon and a flower for the waist and added a few self stick gems for more color.

It is a very easy folded piece to make, even easier since we can cut it with the cricut. This dress looks cute in pastels for little girls, and whites for wedding dresses, and can be dressed up many different ways. I hope you try it out. Have a safe and wonderful 4th of July.
*recipe*
Lacy Labels cartridge
DCWV Nantucket, neutrals stack
misc. ribbon
self stick gems
small flower
blue ink for edges

Monday, June 13, 2011

Ramblin' Thoughts

It's a gloomy Monday morning, and the umph to work outside just isn't there....until I actually get out there. For some reason walking the "farm" in the mornings is so relaxing, it makes me want to stay in the midst of it. Then the longer I'm in the midst of it, the longer my to do list grows. It's a joy, but it gets a bit overwhelming as well. I go out and talk to the rabbits, then the sheep...off to the horses, and then talking to the chickens that work their way around my feet. They all look at me like I'm crazy unless I have food in my hand.

After that I work my way to the garden and greenhouse, which has it's own since of calmness, and another entire list of to do's. While checking the plants I see some empty containers and a bag of soil calling my name. Nothing like going for a morning look and ending up playing in the dirt. It must be that inner child screaming for mud pies. I don't even take the time to get my gloves on, so now I have dirt under my nails....just like when I was 7. I still have things to transplant, and to plant...but for now I'm good with what I have done. My mind still continues to go over everything and praying that my black thumb turns a lighter shade...possibly someday to green.

Now back inside to a whole differnt kind of animal (kids ;) ) and a completely different set of to do's. It's a never ending cycle, and I wouldn't change it for a 9-5 job for any amount of money. I'm waiting for the day that I make a meal entirely from our farm. I'm also waiting for that evening to come and I can go out on the patio with my sweet tea, look around, and see a farm...a real farm. It's getting there. I have a lot of goals, and a lot on my wish list, unfortunately I don't have the magic wand to make it all just appear. So for now I will walk through the animals, and garden that I have...I will stop and look at all of the wildflowers growing in our "meadow" and enjoy the colors. I read about other's with their farms, and their adventures and I relate well. It's easy to talk about the things that are good, and it makes things seem so easy. Afterall it's better to dwell on the good and not the bad (or hard) in any of life's situations. There is going to be ups and downs, hiccups, and sharp turns...it wasn't any different that not being on the farm. The bright side is, even in the midst of a hiccup or sharp turn I can go out and sit with the sheep and watch them play, or feel their soft wool. I can pick up a rabbit and have it sit on my lap. I can sit on a rock and watch the chickens scattered all over the landscape scratching at bugs and whatever else they can find. I can go to the greenhouse, or garden beds and play in the dirt and know that I will have a reward for my work...even if it is just the dirt under my nails. I guess basically it all comes down to...concentrate on the good, look forward to your goals being reached, and enjoy the roller coaster ride it takes to get there.

I hope that everyone has a great gloomy Monday. I'm going to!

Saturday, June 11, 2011

Queen Bee

No unfortunately I didn't get my hives yet, but I did make an adorable birthday card. I've been looking through my card folding magazine and seen this accordian fold that screamed make me when I saw it. So after doing some resizing on my gypsy....I started cutting and piecing together. It's a super simple card, and I enjoyed making it for one of my friends daughter's birthday.

The base of my card is 4 3/4x 20 1/2. I used the citrus stack by DCWV. I cut two strips at 10in. (Next time I would cut one at 10 1/4- 10 1/2 in order to account for gluing them together.) The blue strip is folded at 5 in, the yellow at 10 1/4, 12, 16 1/4 and 18 in. I glued the first fold onto the inside of the blue piece,and the others folded to make the accordian part of the card. I then rounded the corners with my corner punch.

Then I went to my gypsy. I used my PAISLEY cartridge to cut out almost the entire card. I love this cartridge, it is so girly, and I have a lot of them around this house. My cuts are as follows:

queen 1/5x4
bee and layers 3 1/2
crown 3
flowers small 1 larger 1 1/2

then for the sentiment I used the celebrations cartridge. It's your day at 1 1/2, happy birthday at 3 in.

After everything was cut it was time to assemble the card.

One of the best things about this card is all of the cuts were made from scraps...which continues to show me why I keep a box of paper pieces when hubby thinks it's trash ;)

I added some buttons and self stick gems to glam it up a bit. The little bee is a button from Fabulous Findings. It took me a bit of time arranging and rearranging before gluing everything down. I wanted the bee's head to reach the crown, and yet look like it was flying when the card is opened. I used zots pop dots to add dimension to the bee and the flowers. The center of the flowers is a button with a larger self stick gem.

I then glued "It's your day" under the crown, but also hidden by the bee when the card is open. "Happy Birthday" was glued to a 4x4 in square and then placed on the inside fold of the card. I think that it turned out really cute for a great "Queen Bee"
I hope this inspires you to get creative with folds. I'm looking forward to trying different folds, either with paper or for the cards. One last pic of it open from the side and then I'll "bee" off ;) (had to go there)
*recipe*
DCWV citrus stack papers
misc. scrap papers
self stick gems
buttons
Paisley and Celebrations cartridges
Zots pop dots, glue

Thursday, June 9, 2011

For Father's Day


It's time to honor Father's this week. We were asked to design something for this special day this week. I wanted to make a card, but also wanted something different as well. I borrowed this idea from a friend and tweaked it into a card, but could be used as a quick picture book, or scrapbook for any special occasion or person.

As always I gathered what I thought I would use in the project, but this one became an adventure to the tool shed and tackle box.

The first step was to make the pages. I used Plantin schoolbook cartridge for the rectangle and the letters and welded them together. I'm sure you could use any cartridge and font for this to fit your theme. I welded a 9.5x4 in rectangle to a 1.5x4in letter. I spelled out the word DADDY for my card.

I alternated between plain and print cardstock on the letters. I used Colorbok printed cardstock (I think I bought it 10 yrs ago) and for the plain I used DCWV neutral and autumn stacks. After all of the pieces were cut I laid them out to make sure they lined up. Then for me the "fun" part began...that is sarcasm because I hate cutting by hand.

I didn't take any pictures of this unfortunately so bear with me on an explanation. I had to cut the layers down so that they would all fit into a book. I laid the back piece (without a letter) down, and placed the last page on top of that; lined it up to where I wanted it to lay, flipped it over and drew a line to mark where it needed to be cut. I then cut it with a paper cutter. You do this with each layer. Each page from bottom up gets smaller and smaller. The top page I left room to fold over and make a binding for the book. I then inked all of the edges with gold ink. Then to the fun part the decorating.


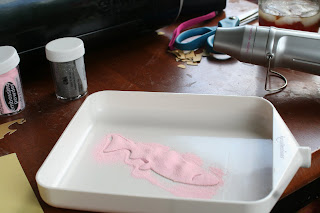
This entire card came to mind because of this fish....the elusive (for hubby) King salmon. I cut him out using the wildlife cartridge at 4.5 in. He's a big fish so I wanted him to take up the entire front. I also cut the layers for him. I used stampendous clear ink and covered both pieces entirely, then I used stampendous pink embossing powder for the bottom layer and stampendous silver for the top layer....used my heat tool on them to finish them, glued the layers together and then set them aside.

It was then time to assemble the book. I placed all of the layers together, folded the binding part over and clipped it on 3 sides so that none of them slipped.

I then grabbed my piercing tool (a hammer, nail, and piece of wood) and pierced the paper 1 inch down and 1 inch up on the side. I then used the same wood and hammer as I added 2 eyelets to secure the pages a bit better.


At this point I added the sentiment inside each page which the entire card reads; DADDY You will always be our King, Happy Father's Day. I decorated with stickers from Jolees Boutique, and ribbon to look like fishing lures. It still looked a little plain so I added fishing line around all of the letters and hooked it into the fishes mouth. I will add what the *recipe* is at the end of the pictures....this is the inside of the card.

*recipe*
Colorbok printed cardstock
DCWV neutral & autumn stack plain cardstock
ribbon
eyelets
gold ink
Jolees Boutique stickers
stampendous clear ink, pink and silver embossing powders
cricut cartridges: Plantin Schoolbook, Wildlife, Calligraphy

Thanks for looking. I hope all father's have a wonderful Father's Day.

Wednesday, June 8, 2011

June Already????


I love waking up in the mornings and looking out to this (my front yard). The trees are finally green, flowers are starting to add color around here again. The bees and butterflies are everywhere (as well as mosquitoes). One thing I have learned these past few years is once it is time for spring/summer in Alaska it gets here quick. It must be because it only gets such a short time. It is still crazy to me to be outside at midnight and it still be daylight. I'm not sure how many hours we have but it seems as if there is no darkness right now every time I'm up.

Things are really starting to come together as a farm here. I'm loving every minute of it. I go out on my back deck and look around and see the chickens running around....getting fat ;)....the horses and sheep in their areas, my rabbits, and then soon to be out there will be the turkeys. Then if I look to the other side of the farm I see my raised garden beds and tires that have plants sprouting in them, and inside my greenhouse I have my peppers and tomatoes as well as strawberries and a few flowers. It is honestly starting to feel like my farm. Thinking back to what we had last year, and what we have accomplished this year already, makes me excited to see what we will have next year. (If I get my wishes, bees, pigs, more sheep, and a cow, but all in the right time.)

I have finally named my farm. It's very simple it's bbb (three bees) acres...not because that is the road we live on but for Blessed Beyond Belief. I could never have imagined having what we have. It has all been a blessing. The friends that we have made that have helped us to get here. The people that we have met along the way, every step has been a huge blessing. My biggest wish/or goal is to be able to use what I have been blessed with to be a blessing to others in some way no matter how small. I have so many things that I want to learn and do in order to not only provide for my family, but to be able to help others, even if it is just a trip to play with the animals.

So that is where we are at half way this year. Fishing season has started and so has camping....I'm excited for both. I could just go out and sleep here in my pop up and feel as if I'm on a camping trip. I could spend the night listening to the owl, robins, crows, chickens, sheep and horses. Or I could just open my bedroom window and hear it as well. For now I'm going to go and enjoy a sunny day living on my farm.....it's actually becoming my farm!!!!